Building a deck is one of those projects that can transform your backyard into an oasis. Imagine grilling out with friends, watching the sunset, or just enjoying a quiet cup of coffee in the morning. Sounds good, right? Well, let’s get into how to build one.
Planning Your Deck
First things first: planning. You can’t just start hammering boards together and hope for the best. You need a solid plan. Think about the size and shape of your deck. Measure the area where you want to build it. You’ll also need to check local building codes and get any necessary permits. Trust me, you don’t want to skip this step.
Deck Plans: Ready-Made vs. Custom
Ready-Made Deck Plans
- Purchasing Plans: Many companies and online resources offer pre-made deck plans that you can buy. These plans come with detailed instructions, materials lists, and often step-by-step guides. Websites like Decks.com, Home Depot, and Lowe’s have a variety of plans you can browse and purchase.
- Free Plans: Some websites offer free deck plans, which can be a great starting point. These plans can provide inspiration and give you a basic blueprint that you can modify to suit your needs.
Custom Deck Plans
- DIY Design: If you have a clear vision for your deck, consider designing it yourself. There are software tools like SketchUp or online deck design tools that help you visualize and plan your deck in 3D.
- Hiring a Professional: For a truly unique and tailored design, you might want to hire a professional deck designer or architect. They can create a custom plan that perfectly fits your space and needs.
Key Considerations for Planning Your Deck
Purpose and Usage
- Primary Function: Think about how you’ll use the deck. Will it be for entertaining, dining, relaxing, or a combination? This will influence the size, layout, and features.
- Traffic Flow: Plan for easy access to the deck from the house and consider the flow of foot traffic. Ensure there’s enough space for people to move around comfortably.
Location and Size
- House Connection: Consider where the deck will attach to your house. The location of doors and windows will influence the design.
- Size: The size of the deck should be proportional to your yard and house. A too-large deck can overwhelm a small yard, while a too-small deck might not be functional.
- Sun and Shade: Pay attention to how the sun moves across your yard. You might want a pergola, awning, or some built-in shading for hot, sunny areas.
Materials and Budget
- Material Options: Choose between natural wood (like cedar or redwood), composite decking, or PVC. Each material has its own cost, maintenance needs, and aesthetic appeal.
- Budget: Determine your budget early on. This will help narrow down material choices and design options. Remember to include costs for permits, tools, and labor if you’re hiring help.
Features and Accessories
- Railing: Consider the style and material of the railing. Options include wood, metal, glass, or cable railings.
- Stairs: Plan for the number and location of stairs. Ensure they comply with local building codes.
- Built-In Seating: Benches or seating areas can be built into the design for convenience and aesthetic appeal.
- Lighting: Incorporate lighting for safety and ambiance. Options include post cap lights, stair lights, and string lights.
- Storage: Consider adding built-in storage for cushions, gardening tools, or BBQ supplies.
Local Building Codes and Permits
- Building Codes: Check your local building codes for requirements on deck construction. These might include guidelines on footing depth, railing height, and joist spacing.
- Permits: Most areas require a building permit for deck construction. Ensure you apply for and receive the necessary permits before starting.
Safety and Accessibility
- Weight Capacity: Make sure your deck is designed to support the intended weight, especially if you plan to have heavy furniture or a hot tub.
- Accessibility: If you need wheelchair access or want to accommodate elderly family members, plan for ramps and wider pathways.
Gathering Materials
Next, gather your materials. You’ll need:
- Pressure-treated lumber (for framing and decking)
- Concrete (for footings)
- Deck screws and nails
- Joist hangers
- Gravel (for drainage)
- Sealant or stain (to protect your deck)
And of course, you’ll need your tools: a saw, drill, level, tape measure, and a post hole digger, to name a few.
Laying the Foundation
Start with the foundation. This is the most crucial part of your deck.
Foundation Footings: The Backbone of Your Deck
Footings are the concrete bases that support the posts holding up your deck. They distribute the weight of the deck and prevent it from sinking or shifting over time. Here’s a step-by-step guide to ensure your footings are solid and level.
Planning and Layout
- Determine the Footing Locations: Based on your deck plan, mark where each footing will go. Typically, footings are placed 8 feet apart, but this can vary based on your deck size and local building codes.
- Mark the Spots: Use stakes and string to outline the deck area and mark the footing locations with spray paint or flags. Ensure the layout is square by measuring diagonally between opposite corners. If the measurements are equal, your layout is square.
Digging the Holes
- Hole Size and Depth: Footing holes should generally be about 12 inches in diameter and at least 24 inches deep. However, the depth can vary based on local frost line requirements. It’s crucial to dig below the frost line to prevent the deck from shifting during freeze-thaw cycles.
- Leveling the Bottom: Once the holes are dug, use a shovel to level the bottom. You want the base of each hole to be as flat as possible to provide a stable foundation for the concrete.
Pouring the Footings
- Gravel for Drainage: Pour about 4-6 inches of gravel into the bottom of each hole. This helps with drainage and prevents water from pooling around the concrete, which can cause it to weaken over time.
- Mixing Concrete: Follow the instructions on the concrete mix bag. Typically, you’ll mix the concrete to a thick, pudding-like consistency. Avoid adding too much water, as this can weaken the concrete.
- Pouring Concrete: Pour the mixed concrete into the holes, filling them to about an inch below ground level. Use a shovel or a piece of rebar to poke into the concrete and remove any air bubbles.
Setting the Footings
- Leveling the Concrete: Before the concrete sets, use a level to ensure the top surface is flat. This step is crucial because an uneven footing can cause the deck posts to be unlevel, leading to structural issues.
- Inserting Post Anchors: While the concrete is still wet, place the post anchors in the center of each footing. Check that the anchors are level and aligned with each other. Use a string line between anchors to ensure they are in a straight line.
Curing the Concrete
Curing Time: Let the concrete cure for at least 24-48 hours, or according to the manufacturer’s instructions, before proceeding with the deck construction. Proper curing is essential for maximum strength.
Tips for Success
- Check Local Codes: Always verify local building codes for footing depth and spacing requirements. These codes can vary significantly depending on your location.
- Renting Equipment: For large projects, consider renting a power auger to dig the holes. It can save a lot of time and effort compared to digging by hand.
- Rebar Reinforcement: In areas with heavy frost or unstable soil, reinforcing the footings with rebar can provide extra strength and stability.
Framing the Deck
With your foundation set, it’s time to frame your deck. The beams go on the post anchors, and the joists attach to the beams. This creates the skeleton of your deck. Make sure everything is level and square. This step can be a bit tedious, but it’s worth getting it right.
Step-by-Step Directions
1. Setting the Ledger Board
The ledger board is a key component because it anchors your deck to the house.
- Select Your Ledger Board: Use a pressure-treated 2×8, 2×10, or 2×12 board, depending on the size and weight of your deck.
- Mark and Cut: Measure and cut the ledger board to the length of the deck.
- Prep the Wall: If your house has siding, you’ll need to cut away a section to expose the house’s rim joist. Install flashing above the ledger board to prevent water damage.
- Attach the Ledger Board: Position the ledger board against the house. Drill pilot holes and attach it using lag screws or bolts. Ensure it’s level and securely fastened.
2. Installing the Posts
Posts support the weight of your deck and connect to the footings you previously set.
- Measure and Cut: Measure the height from the footings to the desired height of your deck and cut the posts accordingly.
- Attach Post Bases: Secure metal post bases to the footings using concrete anchors.
- Install Posts: Set the posts in the bases, ensuring they are plumb (vertically level). Temporarily brace them with scrap lumber.
3. Setting the Beams
Beams run perpendicular to the ledger board and provide support for the joists.
- Measure and Cut: Measure and cut the beams to span the distance between posts.
- Attach Beams to Posts: Use metal post-to-beam connectors or notched posts to secure the beams. Ensure the beams are level and properly supported.
4. Laying Out the Joists
Joists run parallel to the ledger board and attach to the beams, forming the primary support for your decking boards.
- Measure and Cut Joists: Measure and cut the joists to fit between the ledger board and the outer beam.
- Mark Joist Spacing: On the ledger board and the outer beam, mark the spacing for the joists. Standard spacing is 16 inches on center, but 12 inches may be necessary for extra support.
- Install Joist Hangers: Attach metal joist hangers to the ledger board and the beam at each marked location. Use joist hanger nails for a secure fit.
- Place and Secure Joists: Set each joist in the hangers and secure them with nails or screws. Ensure the joists are level and parallel.
5. Adding Blocking and Bridging
Blocking and bridging provide lateral support between joists, reducing movement and adding stability.
- Measure and Cut Blocking: Cut pieces of lumber to fit snugly between the joists. These should be the same width as the joists.
- Install Blocking: Install blocking in a staggered pattern or in a straight line across the span of the joists. Nail or screw them into place.
- Optional Bridging: Install bridging (diagonal braces) if your deck spans a large area. This further reduces lateral movement.
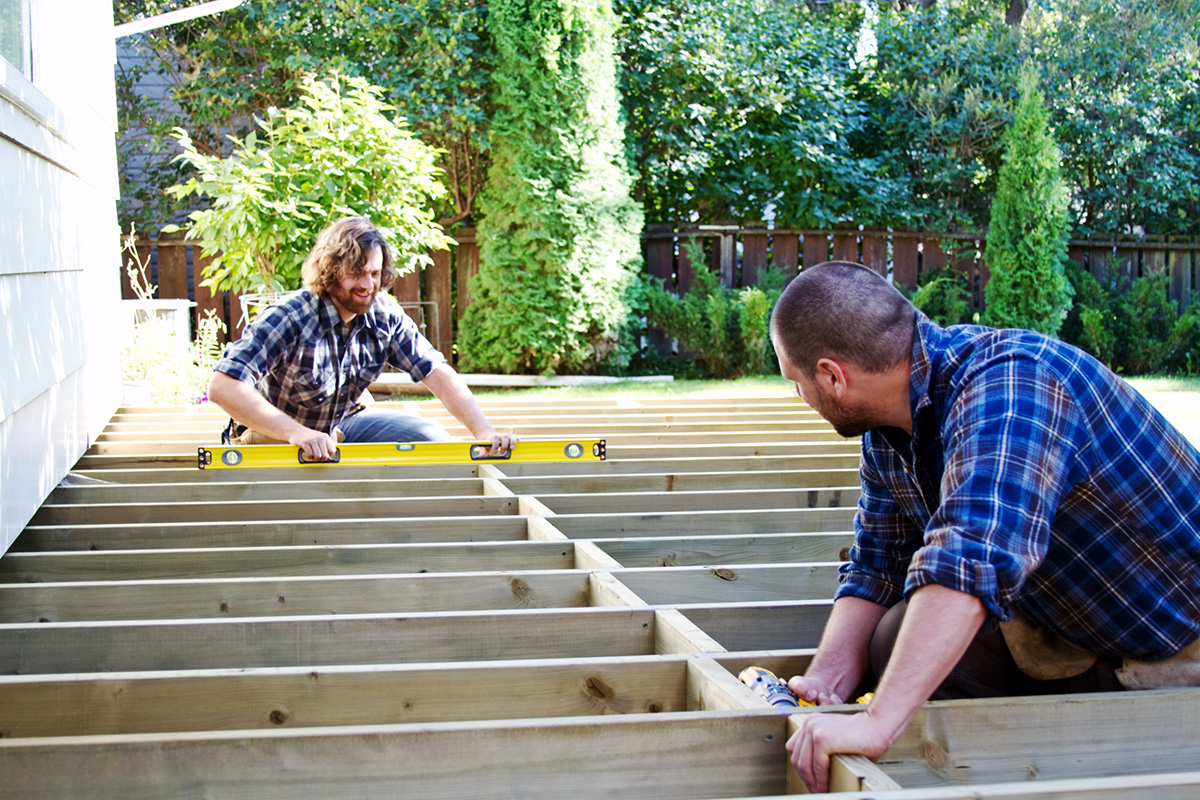
6. Checking for Level and Squareness
Before proceeding to the decking boards, ensure your frame is level and square.
- Check for Level: Use a long level to check the levelness of your joists and beams.
- Check for Squareness: Measure diagonally from corner to corner in both directions. If the measurements are equal, your frame is square. If not, adjust as necessary.
7. Securing the Frame
Reinforce Connections: Go back and reinforce all connections with additional nails or screws, especially at the joints where beams meet posts and joists meet the ledger board and beams.
8. Installing Rim Joists and Trim
Rim joists (also called band boards) run around the perimeter of the deck, giving it a finished look and additional stability.
- Measure and Cut Rim Joists: Measure and cut the rim joists to fit the perimeter of the deck.
- Attach Rim Joists: Secure the rim joists to the ends of the joists with nails or screws. Ensure they are flush with the top of the joists.
Tips for Success
- Use Quality Fasteners: Always use galvanized or stainless steel fasteners to prevent rust and ensure longevity.
- Double Check Measurements: Measure twice, cut once. It’s a classic saying for a reason.
- Work with a Buddy: Framing a deck is much easier with an extra set of hands, especially when lifting and positioning beams and joists.
Installing Decking Boards
Now, for the fun part: installing the decking boards. Start at one end and work your way across, leaving a small gap between each board for drainage. Use deck screws to secure the boards to the joists. Keep checking that your boards are straight and even as you go.
Adding the Finishing Touches
Once the decking boards are in place, it’s time to add the finishing touches. Install the railing if you’re planning on having one. Not only is it a safety feature, but it also adds a nice aesthetic touch. You might also want to add steps, built-in seating, or even a pergola for some shade.
Sealing and Staining
Finally, seal or stain your deck. This step protects the wood from the elements and extends the life of your deck. Choose a day when the weather is clear and apply the sealant or stain according to the manufacturer’s instructions.
Enjoy Your New Deck
And there you have it! You’ve built yourself a deck. It’s a project that takes some time and effort, but the result is worth it. Now you can sit back, relax, and enjoy the fruits of your labor.
More recommended articles
How to Be Your Own General Contractor: Tips from the Pros
How to Install a Hot Water Heater: A Guide for Everyone
How to Become a Professional Handyman: A Guide for Aspiring Contractors
Stop losing profit.
Build bids in minutes and track every dime with ProfitDig.
Start Risk-Free30-Day Money Back Guarantee